Creating a Guest Profile
This option allows users to capture and track details about the guest profiles who reserved rooms at the property.
Perform the following steps to create a guest profile:
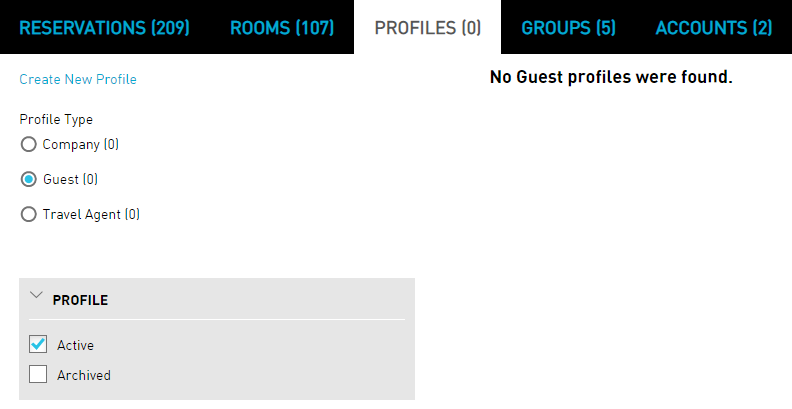
Navigate to Reservations ➜ Profiles. The Profiles tab is displayed.
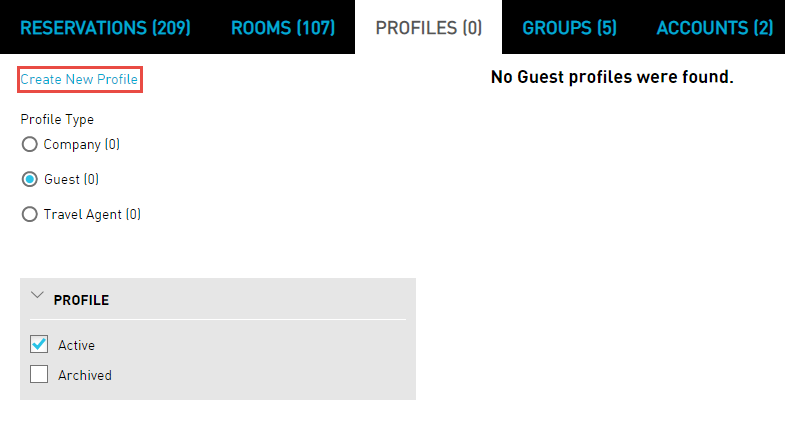
Click Create New Profile. The Create New Profile dialog box appears.
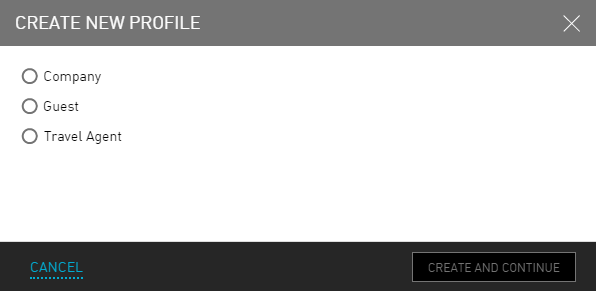
Please read the below instructions and click on the appropriate radio button to create a profile.
|
Field |
Description |
|---|---|
|
Company |
Click to create a profile for a company |
|
Guest |
Click to create a guest profile |
|
Travel Agent |
Click here to create a profile for a travel agent |
Select the Guest radio button.
Click Create and Continue. The Details tab is displayed.
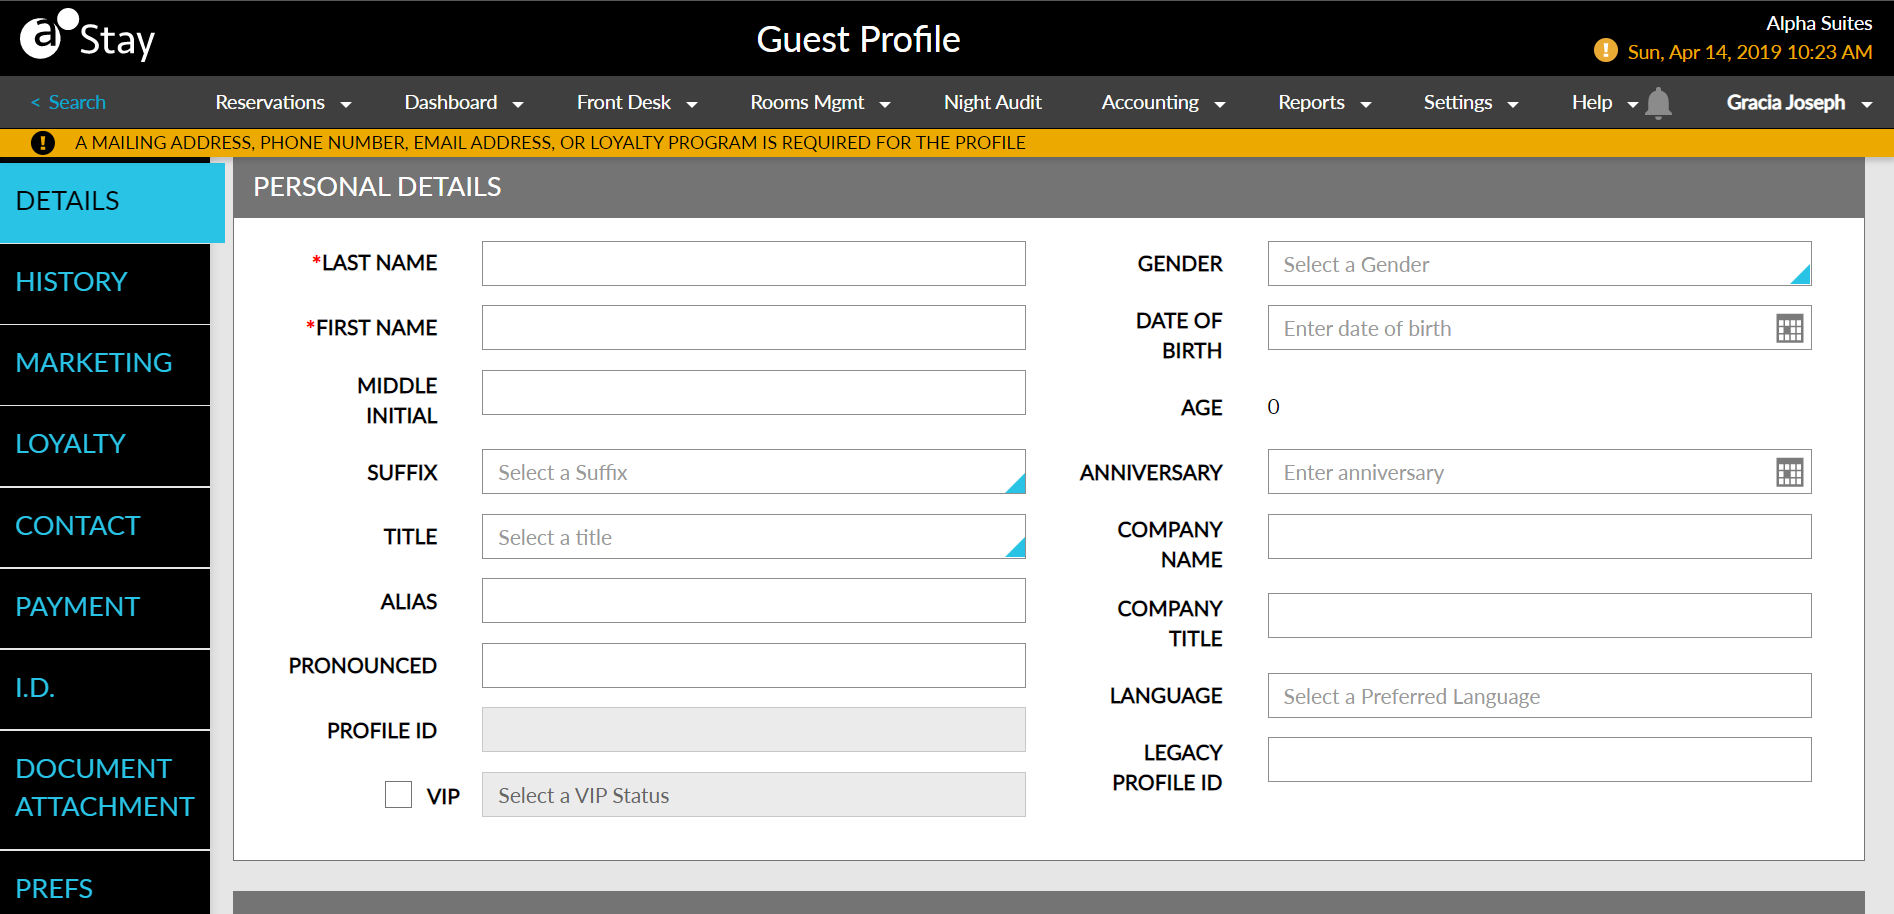
Refer to the following table and fill in the fields to create a profile:
|
Field |
Description |
|---|---|
|
Personal Details |
|
|
Last Name |
The last name of the guest. |
|
Gender |
The gender of the guest. |
|
First Name |
The first name of the guest. |
|
Date of Birth |
The date of birth of the guest. |
|
Middle Initial |
The middle initial of the guest. |
|
Age |
The age of the guest is displayed. |
|
Suffix |
The required suffix of the guest. |
|
Anniversary |
The anniversary date of the guest. |
|
Title |
The title of the guest. |
|
Company Name |
The name of the company. |
|
Alias |
The alias of the guest, if available. |
|
Company Title |
The company name of the guest. |
|
Pronounced |
The pronunciation of the guest. |
|
Language |
The language of the guest. |
|
Legacy Profile ID |
The profile ID of guest from a different PMS. |
|
Marketing |
|
|
Guest Type |
The type of the guest. |
|
Source of Business |
The source of business. |
|
Market Segment |
The market segment of the guest. The Marketing section details appears on reservations and reports. |
|
Loyalty |
|
|
Program |
The loyalty program of the guest. The user can only set one loyalty program as the default per profile. |
|
Tier |
Allows users to select a tier/level configured for the loyalty program. The Tier field is greyed out when the loyalty program does not have a tier/level configured. |
|
Member ID |
The member ID of the loyalty program. |
|
Profile Default |
Selects the default profile. |
|
Address |
|
|
Address Type |
The type of the address. |
|
Street |
The street details of the guest address. |
|
City |
The city name of the guest. |
|
State/Province |
The state/province of the guest. |
|
Zip/Postal Code |
The zip/postal code of the guest. |
|
Country |
The country of the guest. |
|
County |
The county of the guest country. |
|
Keep Private |
Indicates that the address details provided are private. |
|
Phone Numbers |
|
|
Phone Type |
The type of the phone. |
|
Number |
The phone number of the guest. |
|
Extension |
The phone number extension of the guest. |
|
Keep Private |
Indicates that the phone number details provided are private. |
|
Use this Phone |
Select this option to set the mobile number as primary number. |
|
Use This For SMS |
Enable this option to use this mobile number for SMS. Note: This option is displayed only if the phone type is selected as Cellular. |
|
Email Addresses |
|
|
Email Type |
The type of email. |
|
Address |
The email address of the guest. |
|
Payment |
|
|
Add a Payment Method |
Click to add payment method details. Only users with the AddPaymentMethod permission can add a new payment method with their username across all modules in Stay. |
|
Identification |
|
|
ID Type |
The type of the ID. |
|
ID Number |
A unique identification number of the guest. |
|
Expiration Date |
The expiration date of the ID. |
|
Issuing Agency |
The name of the ID issuing agency. |
|
Delete |
Click to delete the record. |
|
Document Attachment |
|
|
Upload Document |
Click to upload necessary guest documents |
|
Download |
Download guest documents |
|
Delete |
Delete existing guest documents |
|
Preferences & History |
|
|
Room Feature |
|
|
Category |
The category of the room preference. |
|
Feature |
The feature of the room preference. |
|
Add Preference |
The preference for the room. |
|
Room Preferred |
|
|
Select Preferred Room |
Choose the guest's preferred room. A maximum of two rooms can be set for each room type. Users can also set the priority of the rooms preferred. |
Click Save & Exit. The guest profile is created successfully.
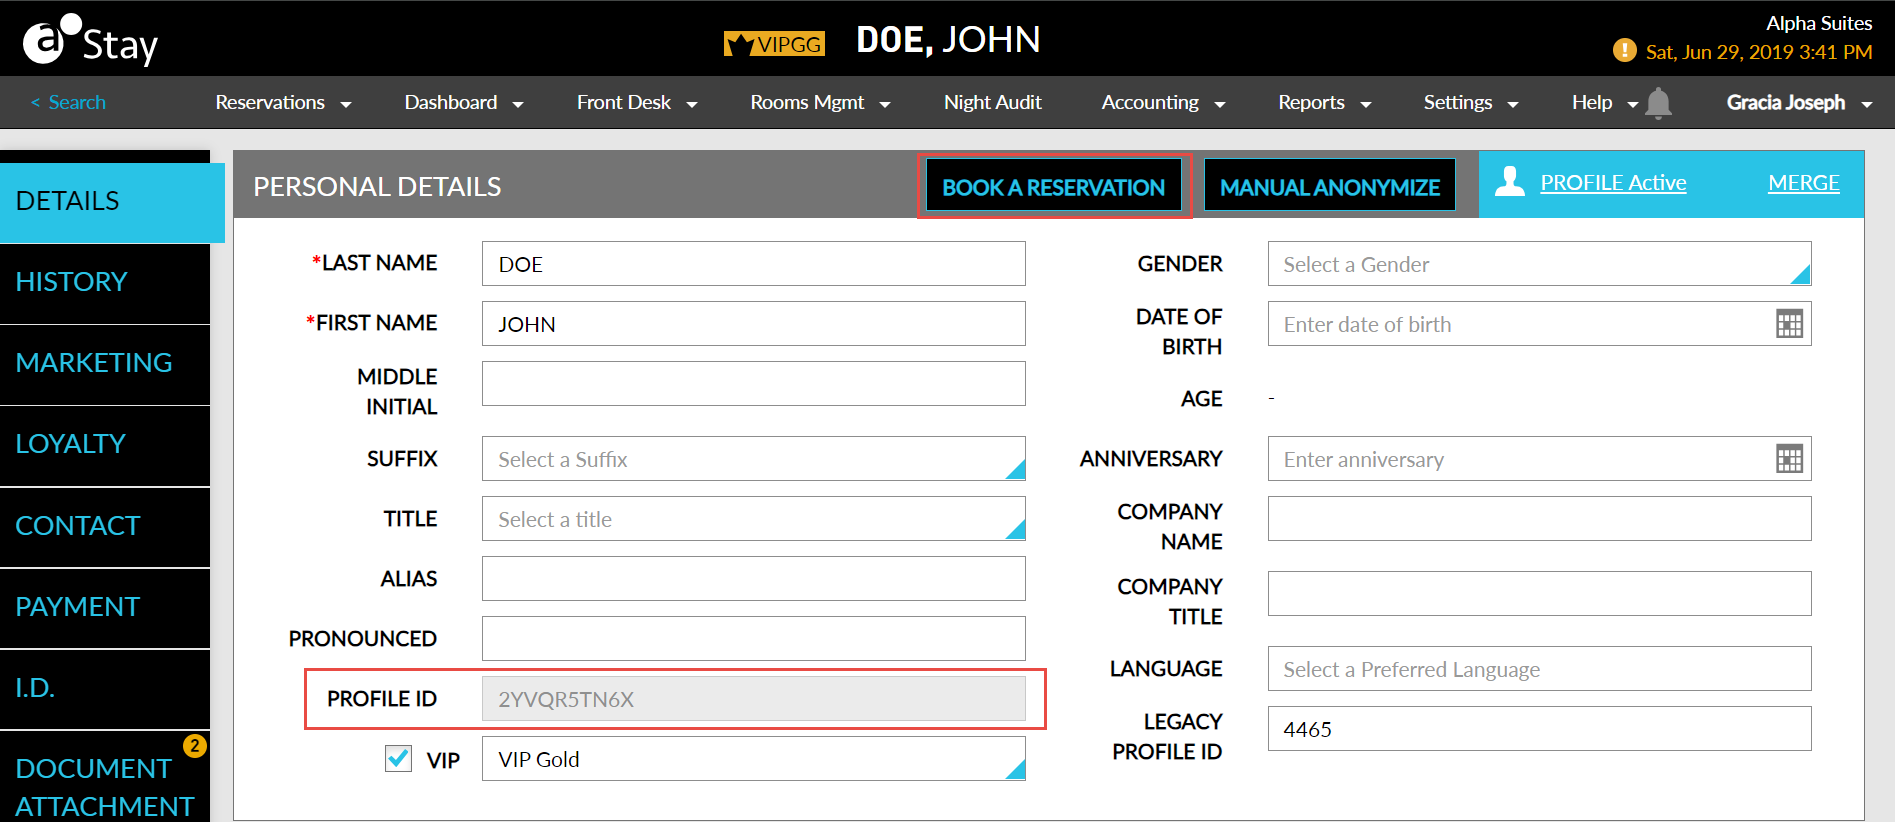
Once a profile is created, a unique guest profile number is generated. Users can use this unique number to refer to a specific profile. For example, if there are two very similar profiles, this unique number can be used to distinguish them from each other. It can also be used in reports to identify and separate similar guests and potentially determine duplicates. The unique profile number is displayed in the Profile ID field. Users can create a reservation directly from the Profile page by clicking the Book a Reservation button. When users open a profile or group that contains an expired card as the payment method, a warning and popup is displayed to the user.
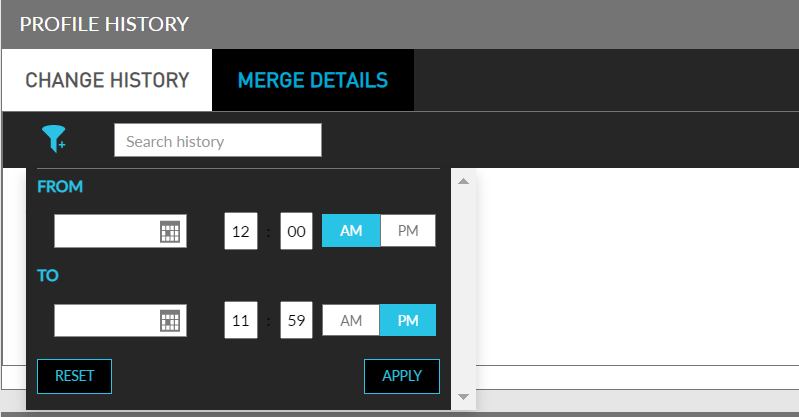
Users can view and print logs of all the changes made to the profile in the Change History section. Users can search for a record or filter records for the selected date and time.
Users can also configure the preferred fields and sections of a guest profile to be displayed to all users in the property. The details of these fields and sections of a guest profile are hidden, and only users with the appropriate permission can unhide and view the details.
The selected fields and sections are hidden only in the guest profiles. The details of the hidden fields will continue to be displayed for the guest profile, or the reservations associated with the guest profile, in all the Reports, in the following screens, and in all the other areas in Stay where the information is to be displayed:
-
Search (Reservations ➜ Search)
-
Batch Operations (Front Desk ➜ Batch Operations)
-
Tape Chart (dashboard ➜ Tape Chart)
-
Book a Reservation (Reservations ➜ Book a Reservation)
Users with the Stay_ViewHiddenGuestProfileFields permission can select the fields to be hidden.
The following fields and sections are available for selection in the Profile Settings screen (Settings ➜ All Settings ➜ General ➜ Profile Settings ➜ Guest Profiles):
-
Personal Details
-
Alias
-
Pronounced
-
Gender
-
Date of Birth
-
Anniversary
-
Company Name
-
Company Title
-
Legacy Profile ID
-
-
Guest Stay History
-
Groups
-
Profile History
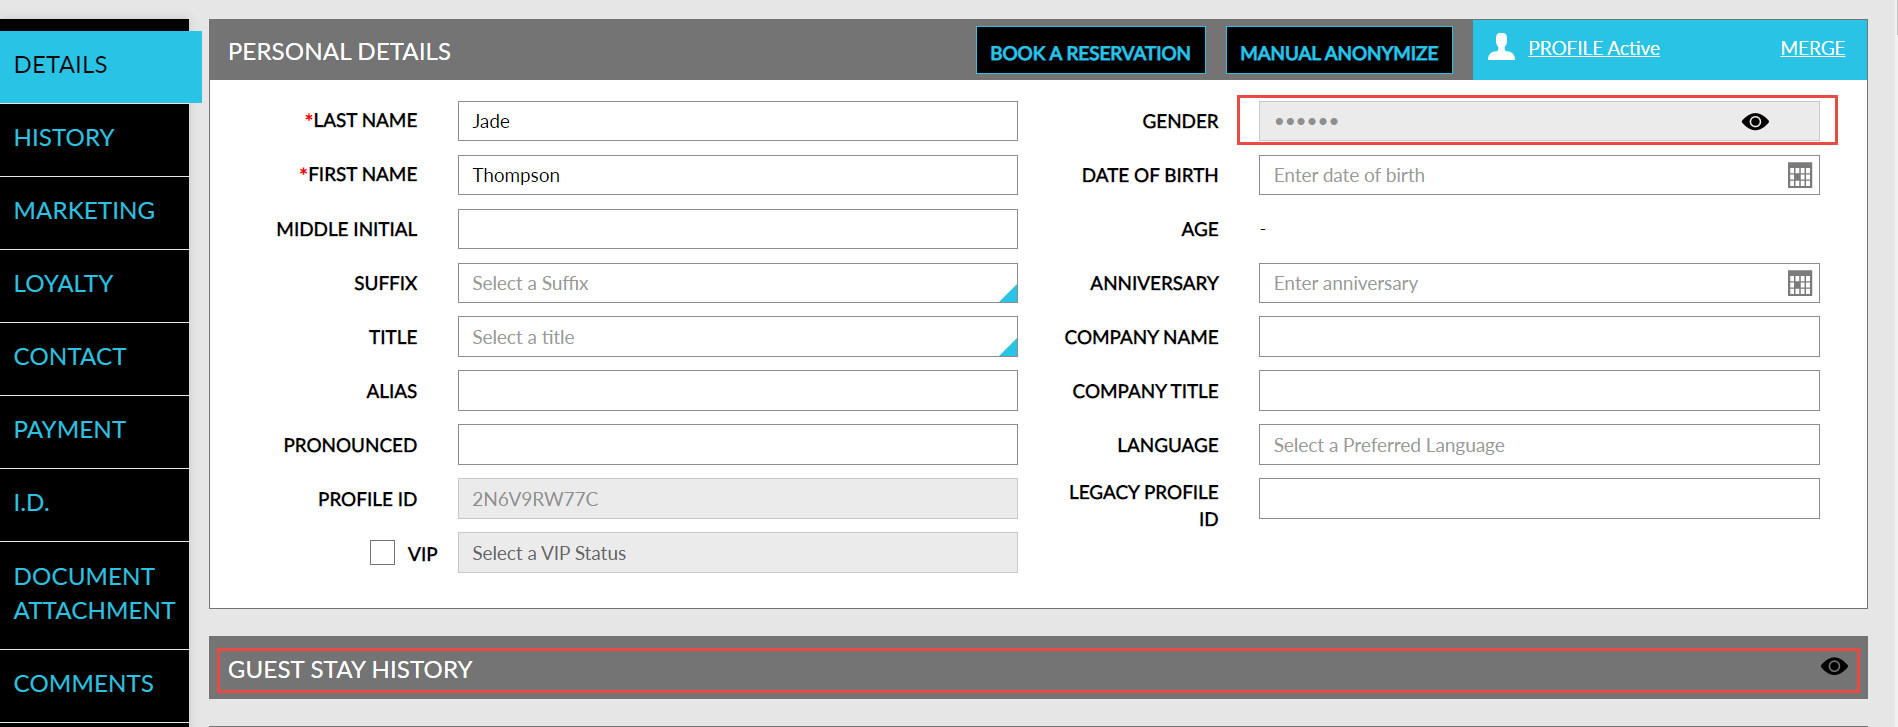
An eye icon is placed alongside the fields chosen to be hidden. The icon will be disabled to users without the permission.
Users with the permission can click the eye icon to unhide and view the details of the fields and modify them. Clicking the eye icon again will hide the details of the fields. The eye icon is displayed only when the selected fields contain values. When users refresh the screen, the fields are hidden again from the user’s view.
The sections chosen to be hidden are collapsed by default. When users with the permission assigned click the eye icon at the right corner of the section, the hidden sections are expanded and displayed.
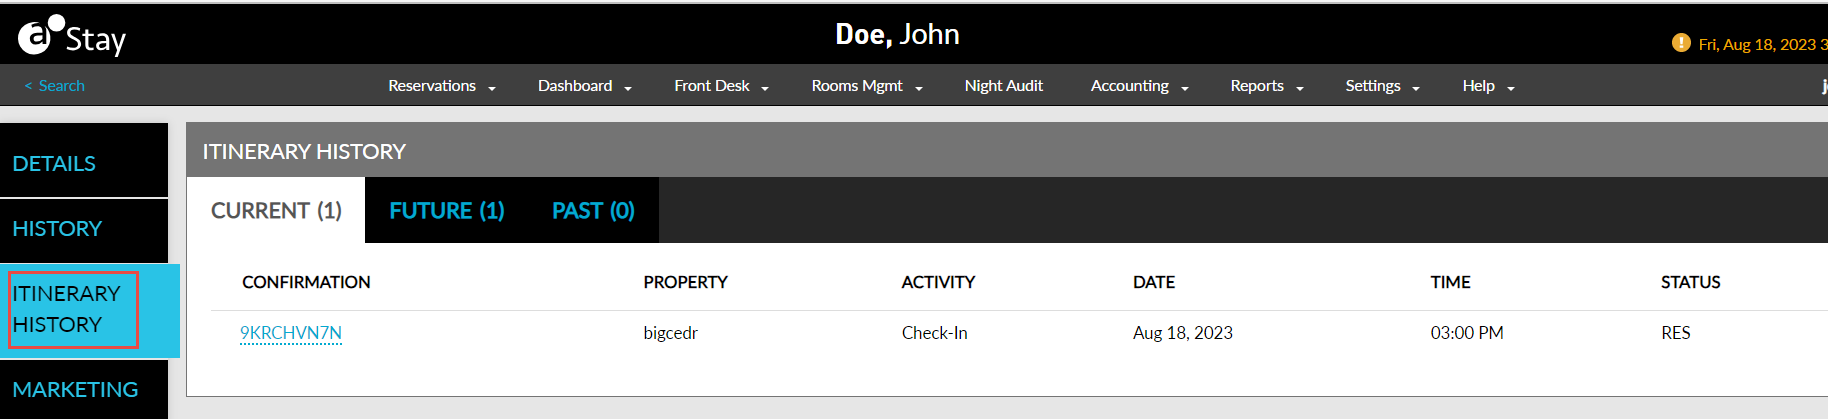
The itinerary history of the guest profiles is displayed in the Itinerary History section. This helps the users to look at the history of bookings made by a guest and understand their stay better. For example, if a guest stays at a property every year and books the golf court and spa services during the stay, users can keep track of the activities previously booked and prepare for the guest’s arrival in advance.
Contact Agilysys to enable the Common Guest Profile and Common Itinerary features at the property to use this feature.
The Itinerary History section displays the following three tabs:
-
Current: Displays the activities that occur on the current property date.
-
Future: Displays the activities that are set to occur in the future.
-
Past: Displays the activities that occurred in the past.
Each tab displays the following columns:
|
Field |
Description |
|---|---|
|
Confirmation |
Displays the confirmation ID of the activity. |
|
Property |
Displays the name of the property in which the activity is booked. |
|
Date |
Displays the date of the activity. |
|
Activity |
Displays the name of the activity based on the reservations made in any Agilysys products. For example, Golf to indicate a reservation in Agilysys Golf. |
|
Time |
Displays the time of the activity. |
|
Status |
Displays the status of the activity. |
Configure Tax Exemptions for Guest Profiles
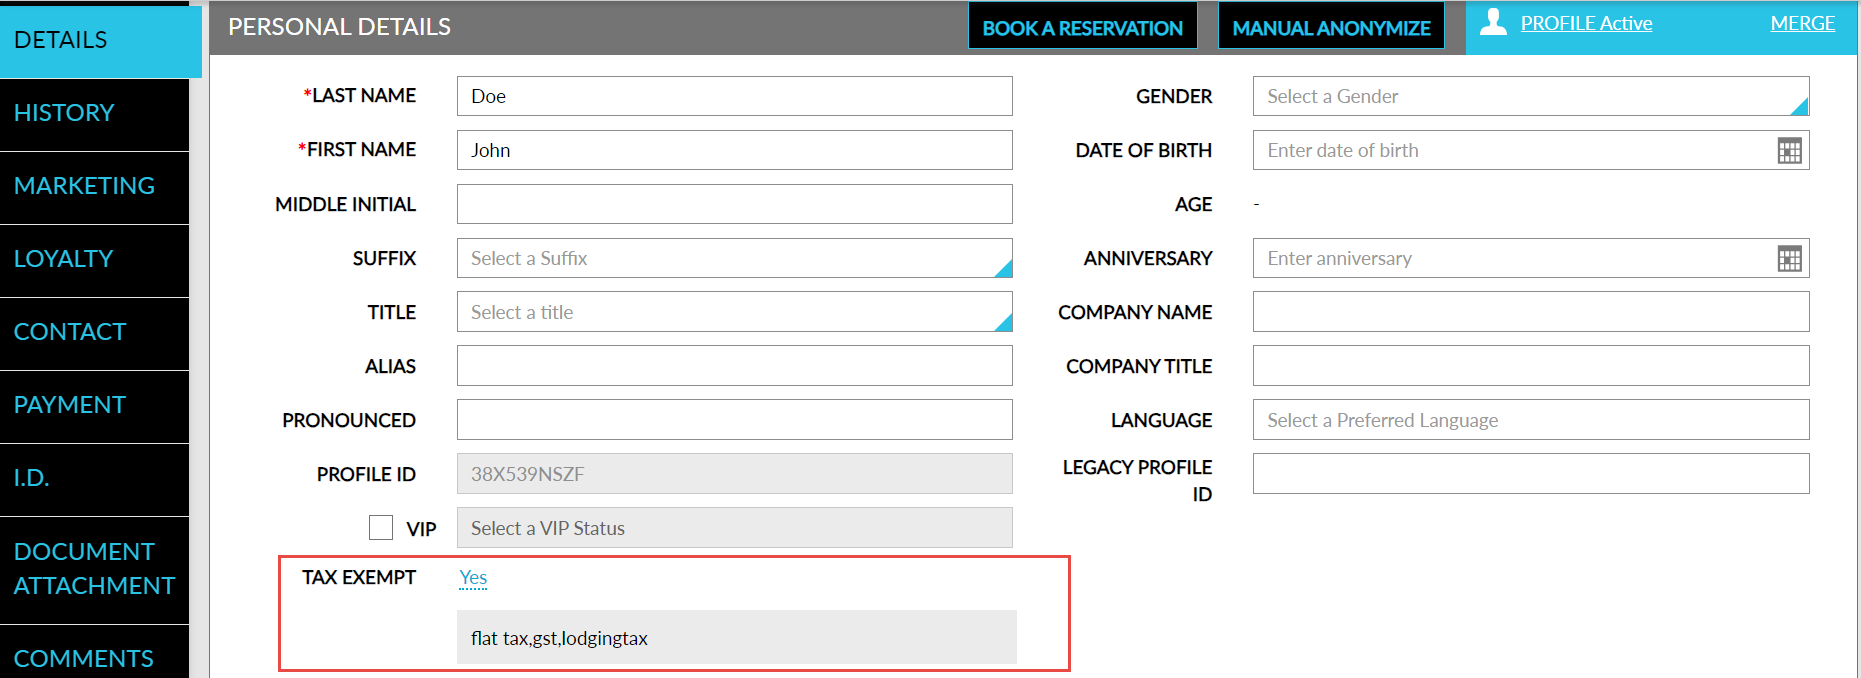
When the Guest Profile Tax Exempt feature setting is enabled, a new field, Tax Exempt, is displayed in the Personal Details section of the selected guest profile. By default, this field displays the value No as a hyperlink.
Perform the following steps to configure the tax exemption options for guest profiles:
Navigate to the Personal Details section of the selected guest profile.
Navigate to the Tax Exempt field and click the hyperlink, No, displayed next to this field. The Tax Exempt Settings pop-up screen appears.
Refer to the following table and fill in the fields:
|
Field |
Description |
|---|---|
|
Tax ID |
Enter the tax ID. This field supports alphanumeric characters. |
|
Tax Exemption |
|
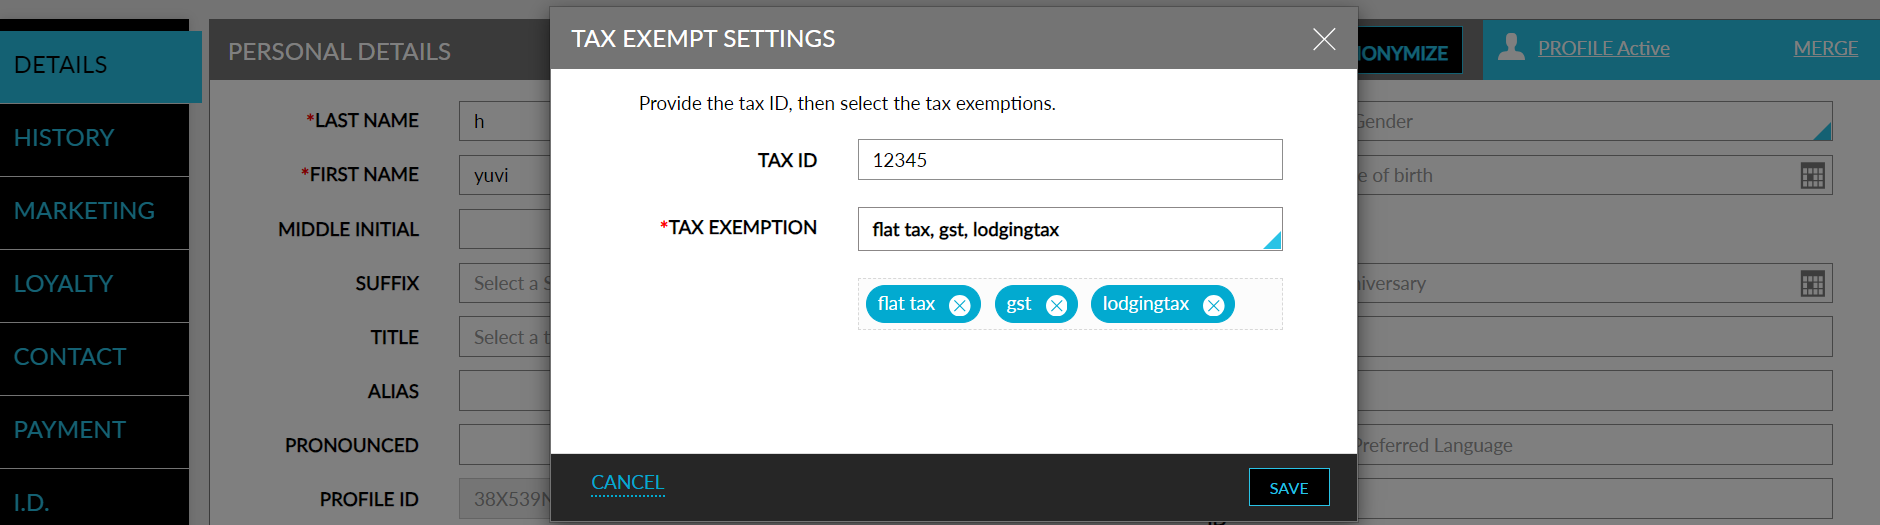
Click Save. The value of the Tax Exempt field changes to Yes and the selected tax classes are displayed in a box below the field. The tax classes displayed inside the box are greyed out and cannot be edited.
Users can also modify the tax classes selected for exemption in the rate plans, packages, and guest profiles. The modifications are only applicable for future reservations created using the rate plan/package and guest profiles and not to existing reservations.
Blocking a Guest Profile
This option indicates that the guest profile is blocked from making future reservations. Guests may be blocked at a single property or across all properties. Blocking or unblocking a guest requires the appropriate permissions. Blocked guests may not be associated with other guest's reservations through the associate to a different profile link. Existing reservations for the blocked guest are not affected, although users will see that the guest has been blocked since they made the reservation. Blocked guests will continue to appear in searches but will be clearly indicated as blocked.
Navigate to Reservations ➜ Profiles. The Profiles tab is displayed.
To search the profile, enter the guest's name that the user wants to block in the Search field and click Go. Based on the entered details, the search results are displayed.
Click the Profile Active link.
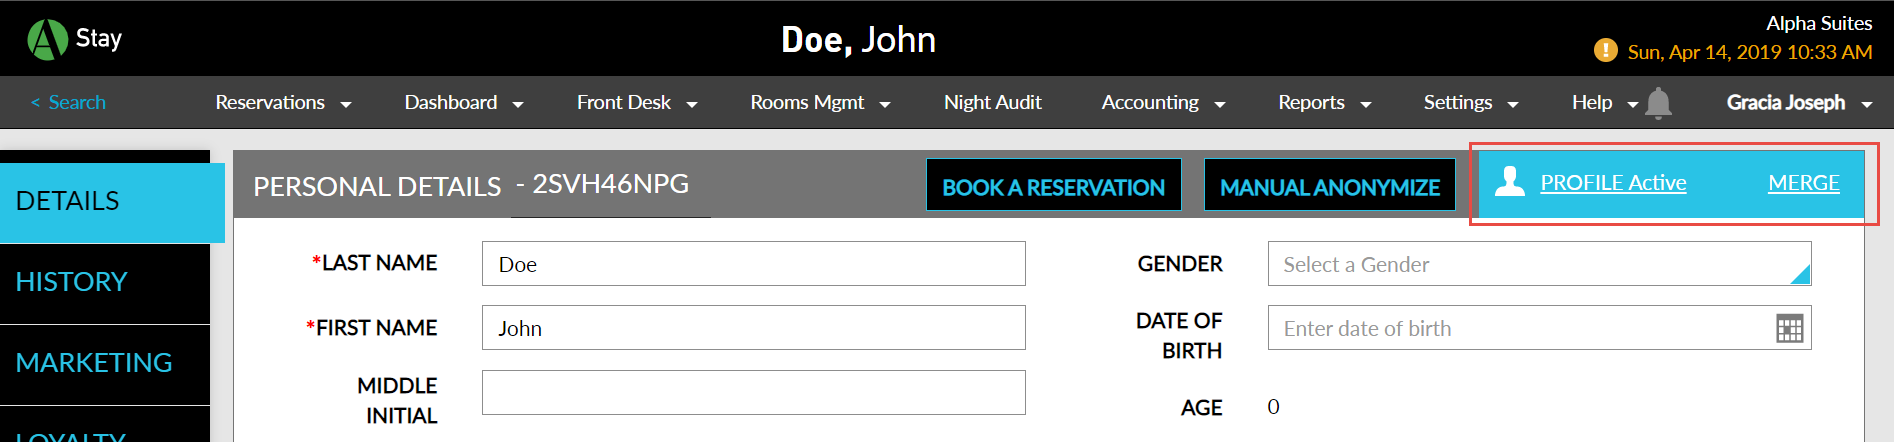
The Book a Reservation button at the top right of the screen initiates the booking process directly from the profile screen. The user is taken to the Book a Reservation screen, where the guest's profile information is pre-filled. The feature can be enabled or disabled through the feature setting named Profile search prior to new reservation.
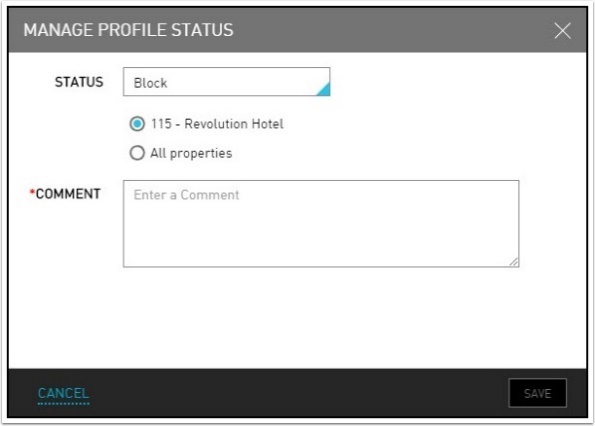
The Manage Profile Status dialog box appears.
Refer to the following table and fill in the fields to manage the profile status:
|
Field |
Description |
|---|---|
|
Status |
The status of the guest profile. |
|
All properties |
The guest will be blocked in all the properties. |
|
Comment |
The reason to block the guest. |
The user can block the guest at the current property or at all properties, if the user has the appropriate permissions.
Click Save to complete the block. Blocked guests will continue to appear in searches but will be clearly indicated in red as blocked.
Apply Guest Consent Policy Based on the Guest’s Primary Country of Residence
Stay allows users to apply a Guest Consent Policy based on the country associated with the primary address of the guest profile.
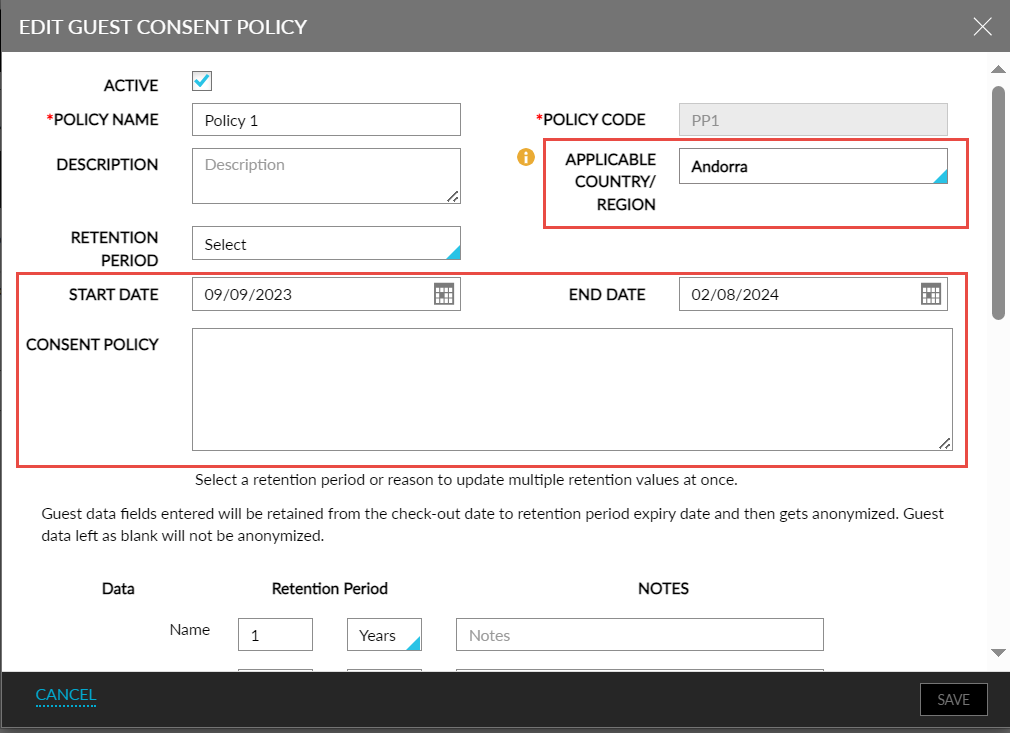
Users can select the country/region for the Guest Consent Policy from the Applicable Country /Region drop-down list in the Add/Edit Guest Consent Policy screen (All Settings ➜ General ➜ Data Retention Management ➜ Guest Consent Policy ➜ Add/Edit). This is an optional field that displays a list of all the countries.
Display Guest Consent Policies During Check-In
When a reservation is checked in, the guest consent policies that are applicable for the guest are displayed in the Check-In pop-up screen based on the following conditions:
-
The current property date must be equal to or greater than the start date of the policy and less than or equal to the end date of the policy (provided the end date is configured).
-
The country associated with the primary address of the guest profile matches the countries selected in the consent policy.
The countries associated with the policy are displayed under the Applicable Country/Region column. Users can select the preferred policies to be applied.
Display Guest Consent Policies in Guest Profile
The consent policies that are applicable for a guest are displayed in the Consent Management section of the guest profile. The countries associated with the policy are displayed under the Applicable Country/Region column. The Renew button for a previously applied policy is disabled if the policy is modified and is no longer applicable for the guest profile.
Display Guest Consent Policies When Creating Reservations
The consent policies that are applicable for a guest are displayed in the Consent Management section in the Other tab of the Book a Reservation screen. The countries associated with the policy are displayed under the Applicable Country/Region column.
Display Guest Consent Policies When Moving Reservations
When reservations are moved to a new property, users can view the consent policies that are available in the destination property by clicking the Update Consent Policy hyperlink present in the Consent Management section in the Others tab of the Move Reservation screen. When clicked, the Updated Consent Policy pop-up screen appears that displays the guest consent policies.
The consent policies are displayed in the Book a Reservation and Move Reservation screens based on the following conditions:
-
The country associated with the primary address of the guest profile matches the countries selected in the consent policy.
-
All the consent policies that do not have a country associated with them are displayed.
-
When a country is not associated with the guest profile, all the available consent policies are displayed.
-
When a guest profile is not selected in the Book a Reservation screen, all the available consent policies are displayed.
Display Guest Consent Policies in Digital Registration Cards
Users can choose to display the guest consent policy when the digital registration card is viewed in tablets by enabling the Display Guest Consent Policy in tablets checkbox in the Digital Registration Card tab of the Registration Card Setup screen (All Settings ➜ Templates ➜ Registration Card ➜ Digital Registration Card ➜ Guest Consent Policy). When enabled, the guest consent policies that are applied to the guest profile are displayed after the Terms and Conditions section when the digital registration cards are generated.
Users can also customize the message that appears next to the I Agree checkbox in the digital registration card by configuring the preferred message in the text box field. A maximum of 1000 alphanumeric and special characters can be entered.
A header for the guest consent policy can be configured in the Header text field. By default, the header is displayed as GUEST CONSENT POLICY. This is a mandatory field that allows users to enter a maximum of 250 alphanumeric and special characters.
Display Guest Consent Policies in Registration Cards
Users can choose to display the guest consent policies when the registration cards for the reservations are printed by enabling the Display Guest Consent Policy checkbox in the Registration Card Message tab of the Registration Card Setup screen (All Settings ➜ Templates ➜ Registration Card ➜ Registration Card Message).
Modify Guest Details of Patrons Retrieved from CMS
Stay allows users to modify the email address, phone number, and address details retrieved for a patron from the following casino management systems when integrated with the property:
-
IGT Casino
-
Konami
-
Bally CMP
-
Aristocrat
Users cannot modify the guest’s name associated with the profile.
Users must enable the newly added, Edit Guest Details During Booking, flag in the Casino Integration Setup screen (All Settings ➜ Accounting ➜ Casino Management) to modify the mentioned details retrieved for a patron in the following screens:
-
Book a Reservation ➜ Guest Information ➜ Create profile using casino details
When users select the Create profile using casino details option and enter the patron ID to create a new guest profile, the mentioned guest details retrieved for the patron from the CMS can be modified.
-
Book a Reservation
When users enter the patron ID in the Book a Reservation screen and click Check Rates, the mentioned guest details retrieved for the patron from the CMS can be modified.
Merge Different Itineraries of a Guest Profile
Stay allows users to merge different itineraries associated with a guest profile. This helps guests to easily track activities that are part of overlapping itineraries.
For example, if an itinerary from January 1, 2024, to January 5, 2024, that has 3 activities and another itinerary from January 3, 2024, to January 5, 2024, that has 2 activities are merged, a single itinerary from January 1, 2024, to January 5, 2024, that has all 5 activities will be displayed.
This enhancement is applicable only when the Common Guest Profile Services (CGPS) and Common Itinerary Services (CIS) are enabled for the property.
Permission
The following permission must be assigned to enable users to merge itineraries.
-
Stay_MergeItinerary
This permission is assigned to the following roles by default:
-
System Administrator
-
Stay Hotel Manager
-
Department Manager
-
Profile Management
-
Stay Front Desk
-
Stay Hotel Supervisor
-
GSA Supervisor
-
Stay Accounting
-
Accounts Receivable Manager
-
Stay Night Audit
-
Stay Reporting
Merge Itineraries
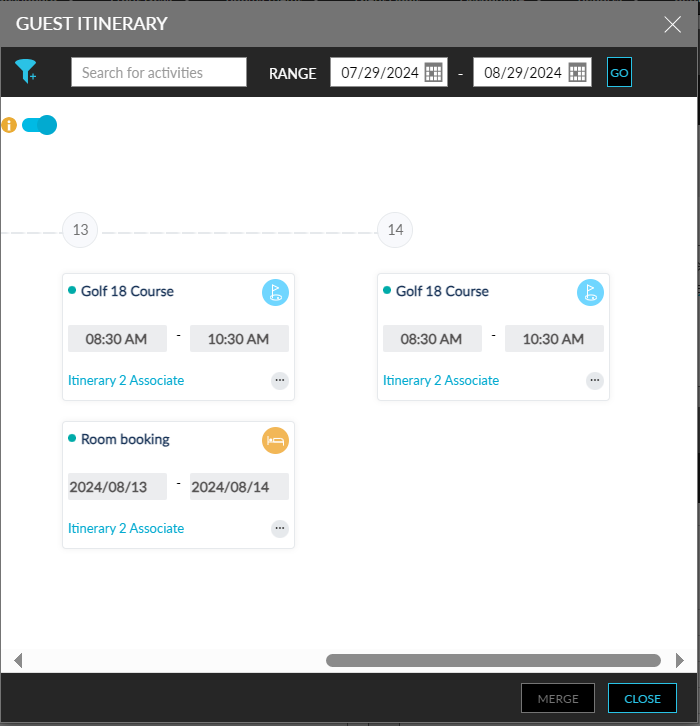
When users access a reservation, the count of the itineraries associated with the guest profile will be displayed in the itinerary badge in the Reservation Summary section of the reservations. This count includes the itineraries created for the guest profile in the past, present, and future. When users click on the highlighted itinerary badge, the Guest Itinerary pop-up screen will be displayed. By default, the itineraries that are available for a period of 15 days prior to the arrival date and 15 days beyond the departure date of the reservation will be displayed. The date and time of each itinerary will be displayed along with activity icons. Users can modify the date range if required. Based on the date range selected, the itineraries are retrieved and displayed.
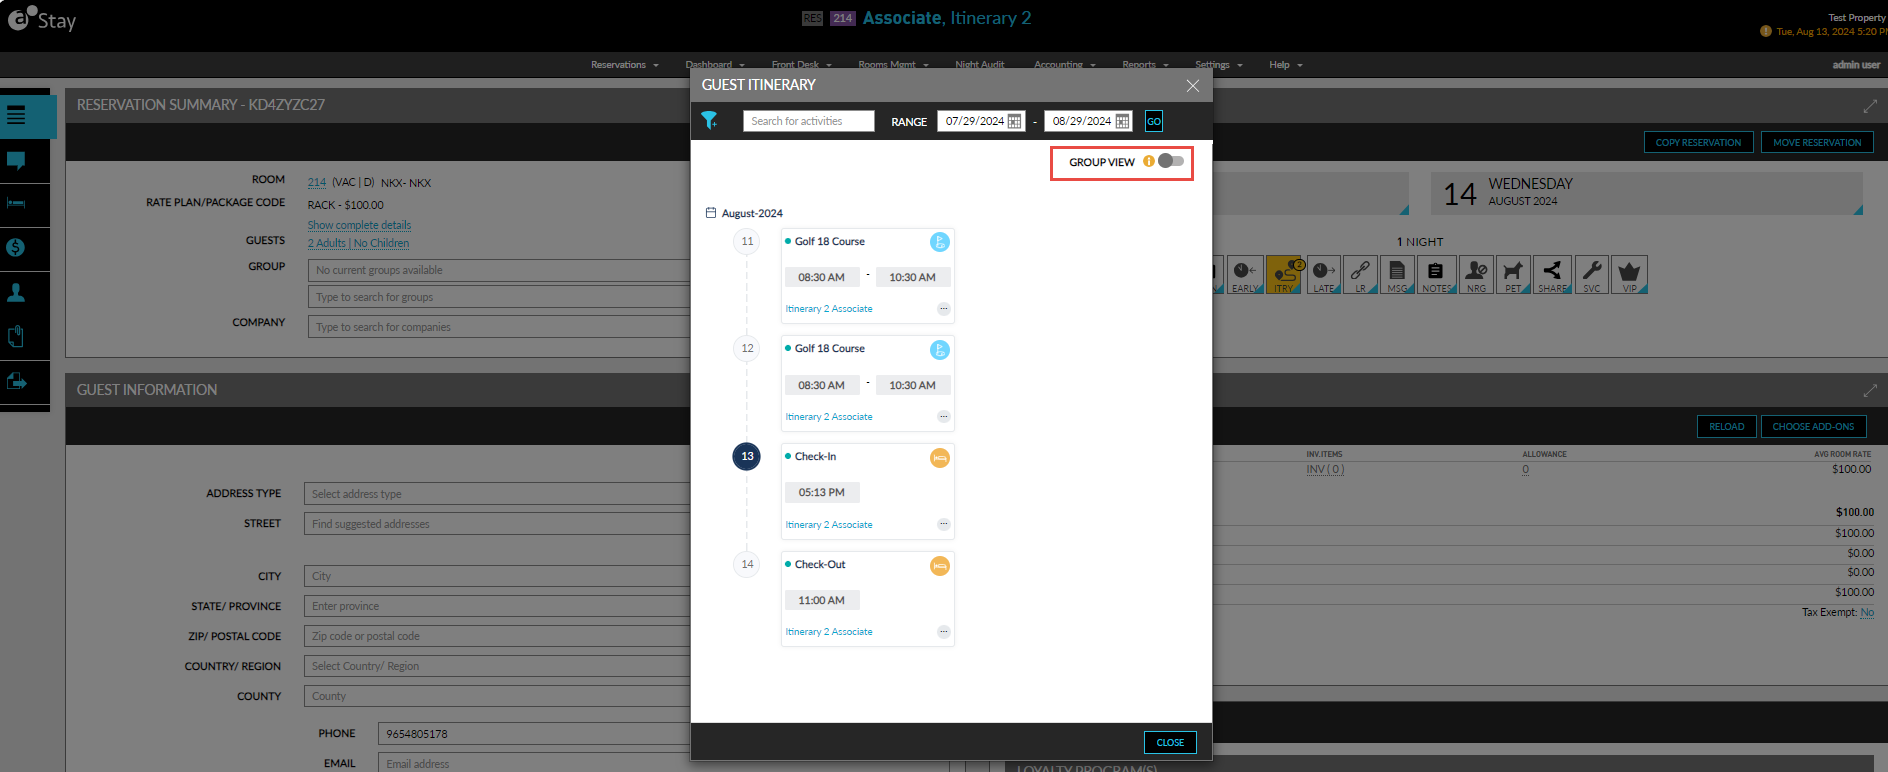
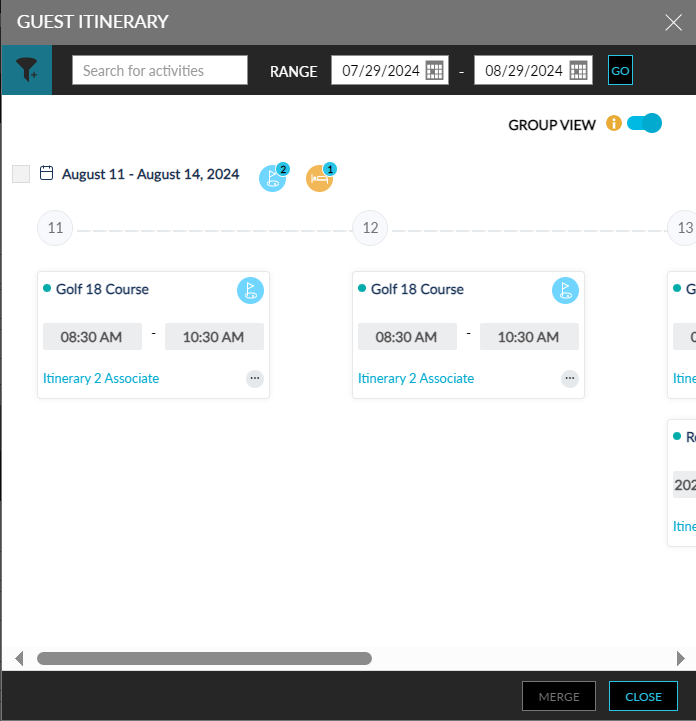
The Group View flag is displayed in the Guest Itinerary pop-up screen. This flag is disabled by default. When enabled, the itineraries available for each date in the selected date range will be grouped and displayed. When displayed in the grouped view, users can choose to merge itineraries of different dates by selecting the preferred itineraries and clicking on the Merge option. The Merge button is displayed and enabled for selection only when the Group View flag is enabled. When clicked, the Confirmation pop-up screen appears that prompts users to confirm if the selected itineraries must be merged.
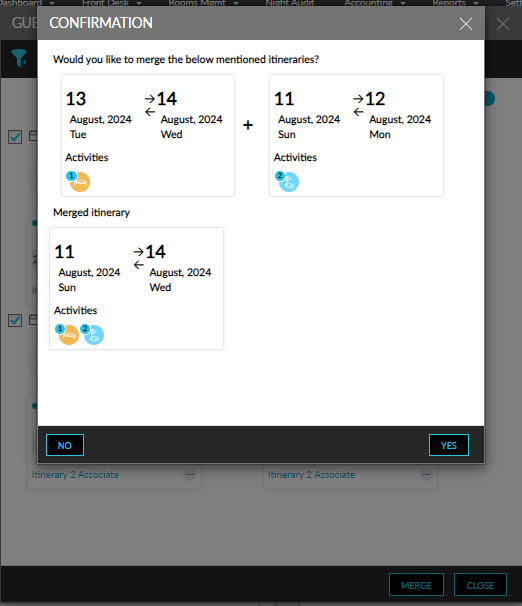
The itineraries selected to be merged, and the merged itinerary will be displayed in the pop-up screen. When users click Yes, the selected itineraries will be merged, and the merged itinerary will be displayed in the Guest Itinerary pop-up screen. The count of the itineraries are updated in the itinerary badge of the reservation and when users click the badge, the merged itinerary is displayed.
Flag Guest Profiles as NRG
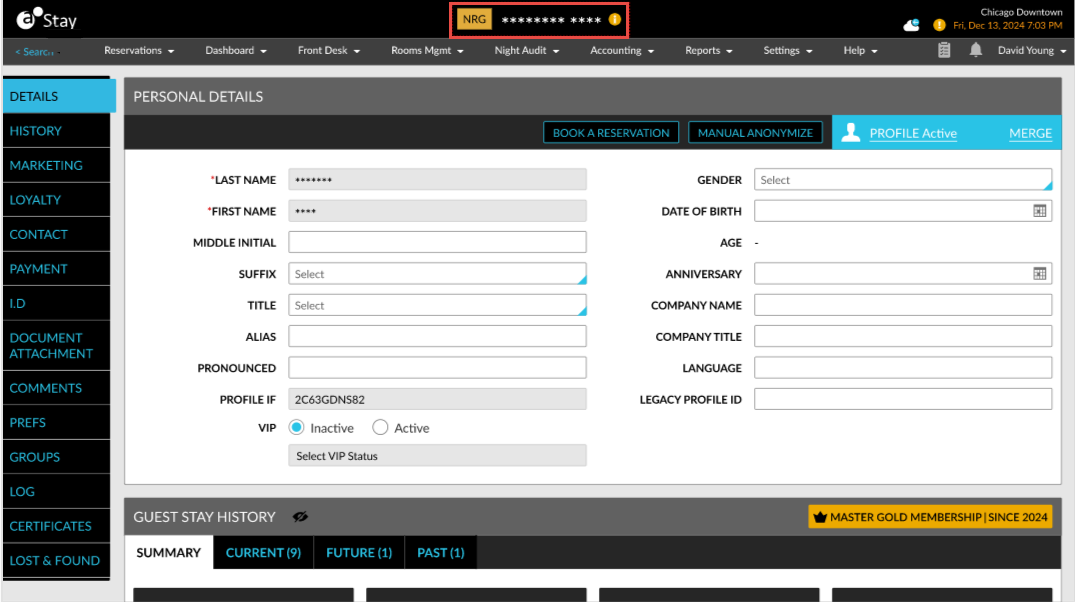
Stay allows users to flag a guest as a Non-Registered Guest (NRG). When a guest profile is flagged as an NRG, the guest’s identity is concealed in all reservations created for the profile using a masked or alias name.
Feature Setting
The following feature settings must be enabled to use this feature.
-
Reservation Alias
-
Enhanced Non-Registered Guest (Reservations)
Permission
The following permission must be assigned to users:
-
StayManageNRGReservations
Property Setting
Users must enable the Add NRG to Profile flag in the Non-Registered Guest section of the Guest Profile Defaults screen (All Settings ➜ General ➜ Profile Settings). When enabled, profiles associated with a reservation marked as NRG will be masked until the reservation is checked out or when the NRG is manually removed from the reservation.
Mark Profiles as NRG
When the Add NRG to Profile flag is enabled and users mark a reservation as NRG, the guest profile associated with the reservation will be marked as NRG for the duration of the reservation. The guest profile name will be masked or replaced by an alias name in the following screens:
-
Batch Operations: Check-In, Deposit Due, Batch Edit, and Batch Posting tabs
-
Reports
-
Waitlist and Enquiry
-
Lost and Found
-
Storage
-
Guest Itinerary
-
Guest Satisfaction
-
Function Rooms
When users access the guest profile marked as NRG, the profile name in the header will be masked or replaced by an alias name and an NRG badge is displayed next to the name. An information icon is displayed to users with the StayManageNRGReservations permission. When users hover over the icon, the guest profile name will be displayed. The first and last name fields of the guest profile are masked and cannot be modified.
The NRG details inherited from the reservation will be removed from the profile in the following scenarios:
-
When the reservation is checked out
-
When the reservation is marked as Canceled/No-Show
-
When the night audit is completed
-
When the NRG badge is disabled for the reservation manually
In this case, the following details are updated in the guest profile:
-
The masked/alias name is replaced with the guest name
-
The NRG badge and the information icon is removed
-
The first and last name fields are unmasked and can be modified
Additionally, when users disable the Add NRG to Profile flag, the guest profile will no longer be flagged as NRG. When the flag is enabled again, the previous selection will not be retained.
Search NRG Profiles
Users can search for an NRG profile using the guest profile’s name. The guest profile retrieved will be displayed with an NRG indicator. The information icon with the guest’s actual name will be displayed only for users with the StayManageNRGReservations permission. When the guest profile has an alias name, users can search for the profile using the alias name. The retrieved profile will be displayed with the alias name, information icon, and NRG badge.
Search results for NRG profiles are displayed as follows:
-
When the guest profile has two or more reservations for the same duration of stay for which one reservation is marked as NRG with alias name and the other is marked as NRG with masked name, masking is given priority, and the guest profile name will be masked and displayed even when accessed from the reservation marked as NRG with alias name.
-
When the guest profile has two reservations, one marked as NRG with alias name and the other not marked as NRG, the guest profile is displayed with the alias name when accessed from both the reservations.
-
When the guest profile is searched in Stay, the guest profile details are displayed without masking or alias name. The profile name is masked or replaced with the alias name only when accessed from an NRG reservation.
Records in Audit Log Screen
A record is created in the Audit Log screen when the Add NRG to Profile flag is enabled or disabled.
Merge Profiles
When users merge a profile with an NRG profile, the following message will be displayed in the Profile Merge pop-up screen after an NRG profile is selected: Merging cannot be performed for the profile in NRG status. The Merge option will be disabled for NRG profiles.
View Guest Profile Details in External Applications
Stay allows users to access a guest profile available in an external application used for managing guest profiles directly from Stay. These profiles are referred to as global profiles.
The global profiles in Stay are provided with a hyperlink to navigate users to the external application when clicked.
Contact Agilysys to enable this feature for a property.
Once the feature is enabled for a property, a hyperlink, Global Guest Profile, is added to the guest profiles associated with reservations created through ACRS. The unique ID generated for these reservations, referred to as the ACID ID, are associated with the guest profiles used for booking.
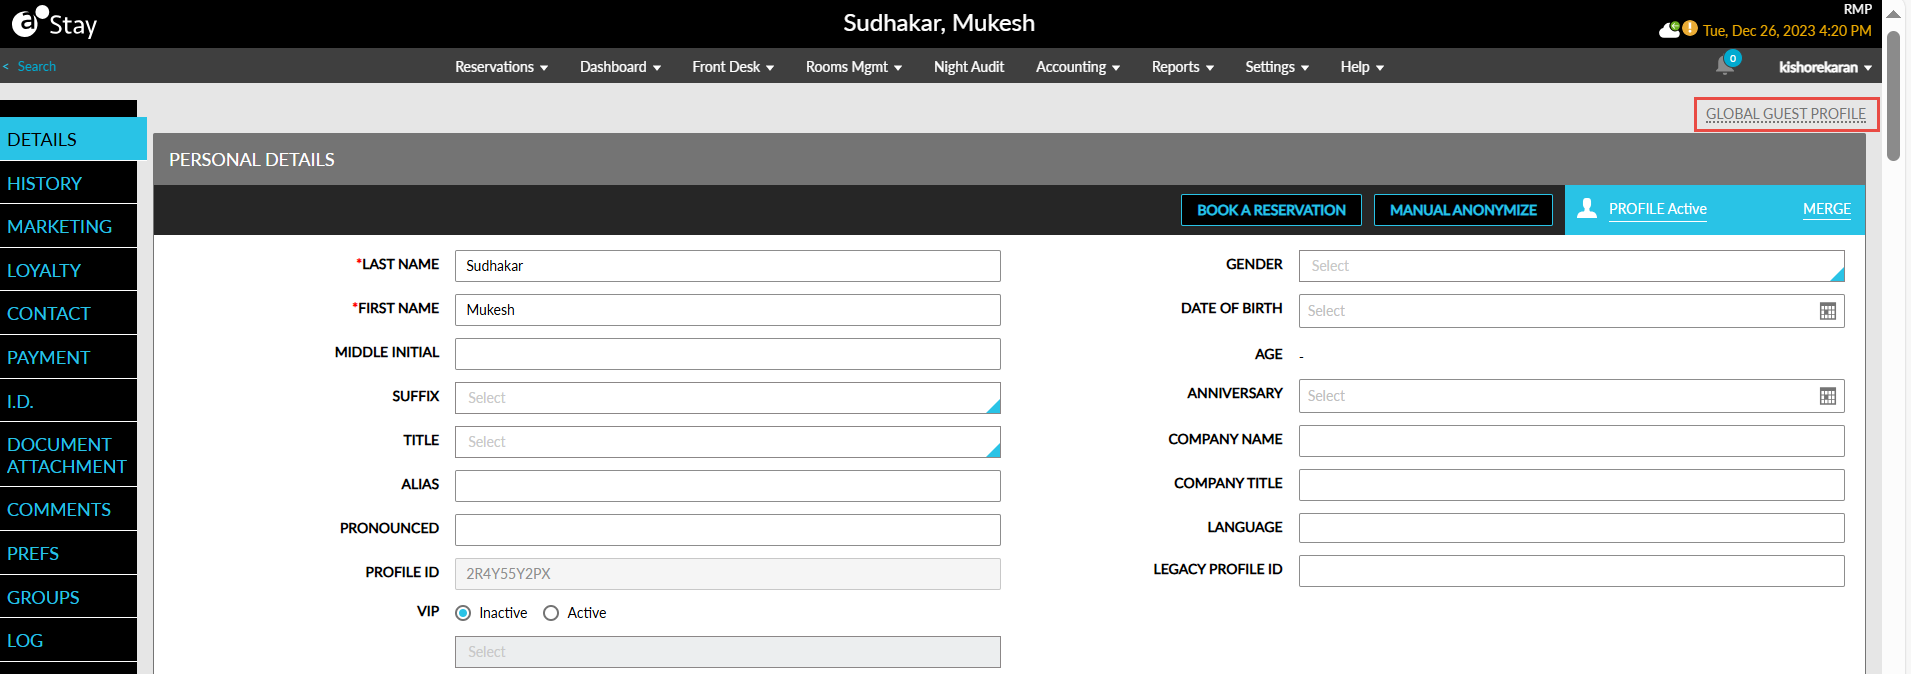
The hyperlink is enabled only for profiles for which an ACID ID is available. When users hover over the hyperlink, the following message is displayed: View/Edit Global Profile. The hyperlink is greyed out for profiles for which an ACID ID is not available. When users hover over the hyperlink, the following message is displayed: No Global Profile Found.
When users click on the hyperlink, they are redirected to the external application in a new tab.
Restrict Users from Modifying Guest Profiles
Stay allows only authorized users to modify guest profiles when associated with a loyalty program or when the profile is linked to one or more active reservations. Users are restricted from modifying the guest name and adding/modifying the contact information in guest profiles.
Permissions
The following permissions must be assigned to use this feature.
|
Field |
Description |
Permissions Assigned |
|---|---|---|
|
Stay_GuestProfileFieldAddEdit |
Users with this permission assigned can edit the restricted fields and add contact details in a guest profile. |
|
|
Stay_GuestProfileFieldConfiguration |
Users with this permission assigned can configure restricted fields for a guest profile. |
|
|
Stay_GuestProfileFieldDelete |
Users with this permission assigned can delete the restricted fields configured for a guest profile. |
|
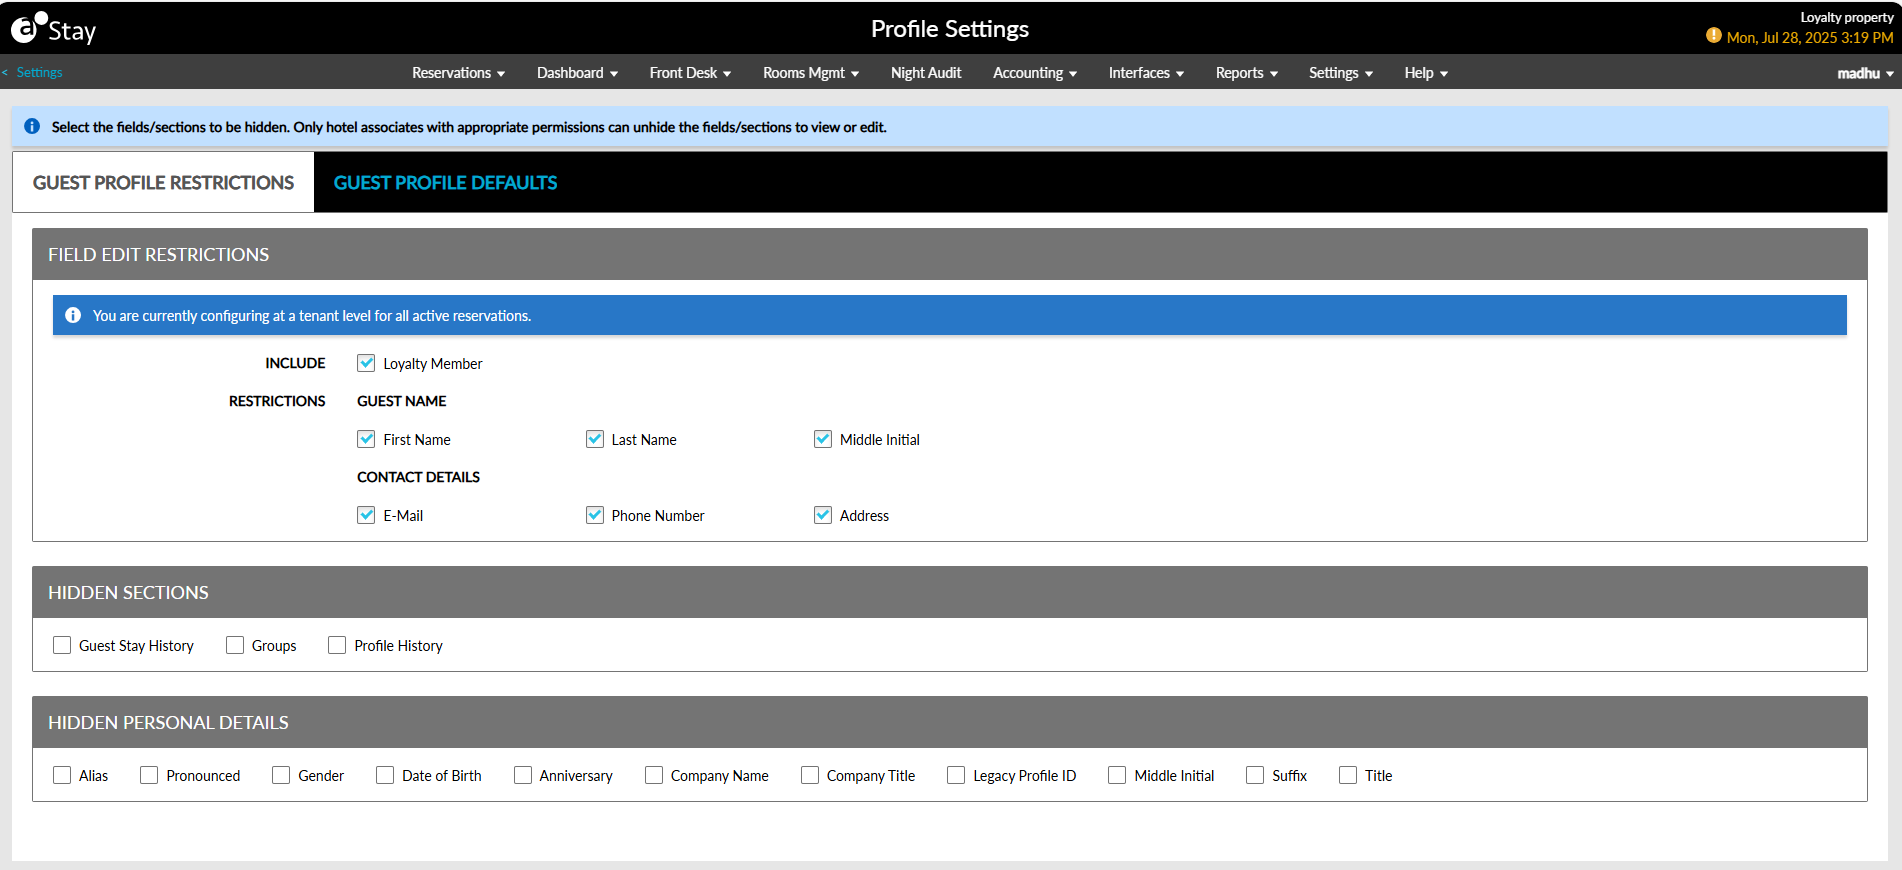
Users must configure the required settings in the Guest Profile Restrictions tab in the Profile Settings screen (All Settings ➜ General ➜ Profile Settings). A new section, Field Edit Restrictions, has been added to this tab. Additionally, the following existing sections from the Guest Profile Defaults section has been moved to this tab:
-
Hidden Sections
-
Hidden Personal Details
Field Edit Restrictions
The Field Edit Restrictions section allows users to select the guest name and contact details fields to be restricted from being modified. The following message is displayed in this section: You are currently configuring at the tenant level for guest profiles with active reservations. The following fields are displayed in this section:
-
Include - Loyalty Member
-
Restrictions - Guest Name
-
First Name
-
Last Name
-
Middle Initial
-
-
Restrictions - Contact Details
-
E-Mail
-
Phone Number
-
Address
-
Include Loyalty Member
The Loyalty Member checkbox is not selected by default. When this checkbox is not selected, users without permission are restricted from modifying the guest name and contact details of guest profiles without loyalty programs that are associated with one or more active reservations. When the guest profile is not associated with active reservations, users are allowed to modify the guest name and contact details.
When this checkbox is selected, users without permission are restricted from modifying the guest name and contact details of guest profiles with loyalty programs that are associated with one or more active reservations. The following message is displayed to users: Guest name and/or contact details cannot be edited as the profile has a loyalty member id and associated with one or more active reservation. When the guest profile is not associated with any active reservations, the following message is displayed: Guest name and/or contact details cannot be edited as the profile has a loyalty member id.
When this checkbox is selected and a guest profile does not have a loyalty program but is associated with active reservations, users without permission are restricted from modifying the guest name and contact details and the following message is displayed: Guest name and/or contact details cannot be edited as the profile is associated with one or more active reservation.
When there is no member number on a local profile and local profile is not associated to one or more active reservation (Arriving or In-House or Reserved), then the user is not restricted to edit the guest name and contact information.
Restrictions - Guest Name and Contact Details
This section allows users to select the guest name and contact details fields to be restricted from being modified. Users can select from the following guest name fields:
-
First Name
-
Last Name
-
Middle Initial
The following contact details fields can be selected:
-
E-Mail
-
Phone Number
-
Address
The selected fields cannot be modified by users without permission assigned.
List of Impacted Areas
The fields selected in the Field Edit Restrictions section cannot be modified by users without the Stay_GuestProfileFieldAddEdit permission assigned in the following areas:
-
Guest Profiles
-
Associate to a Guest Profile pop-up screen
-
Guest Information section of the Book a Reservation screen
-
Add a Contact pop-up screen when users add a contact for a group (Group ➜ Group Booking ➜ Group Contacts ➜ Add ➜ Search for a guest)
-
Guest Information section of the Book a Reservation screen when creating reservations for groups
-
Add a Contact pop-up screen when users add a contact for a linked group (Group ➜ Linked Groups ➜ Select group ➜ Group Booking ➜ Group Contacts ➜ Add ➜ Search for a guest)
-
Add pop-up screen that appears when users add a contact for a travel agent profile (Travel agent profile ➜ Contacts ➜ Add ➜ Search for a guest)
-
Add a Contact pop-up screen that appears when users add a contact for a company profile (Company profile ➜ Contacts ➜ Add ➜ Search for a guest)
-
Profile Details section of the Add Waitlist/Inquiry pop-up screen (Reservations ➜ Waitlist and Inquiry ➜ Add)
-
Booker tab of the Book a Reservation screen when modifying booker profile details for reservations
List of Fields Restricted in the Impacted Areas
Guest Profiles
The following fields are greyed out and displayed:
-
First Name
-
Last Name
-
Middle Initial
-
Email Addresses section
-
Type
-
Address
-
Use this Email
-
Others
-
-
Phone Numbers section
-
Type
-
Number
-
Extension
-
Use This Phone
-
Others
-
-
Address section
Associate to a Guest Profile
The following fields are greyed out in the Associate to a Guest Profile pop-up screen that appears when users select the Associate to a Different Profile hyperlink in the Guest Information section of reservations.
-
First Name
-
Last Name
-
Middle Initial
-
Contact section
-
Phone
-
Phone Type
-
Extension
-
Email
-
Email Type
-
-
Address section
Book a Reservation
The following fields are greyed out in the Guest Information section of the Book a Reservation screen when users select the Edit Profile hyperlink.
-
First Name
-
Last Name
-
Middle Initial
-
Contact section
-
Phone
-
Phone Type
-
Extension
-
Email
-
Email Type
-
-
Address section
Add Contacts for Groups
The following fields are greyed out and displayed in the Add a Contact pop-up screen when users add a contact for a group (Group ➜ Group Booking ➜ Group Contacts ➜ Add ➜ Search for a guest):
-
First Name
-
Last Name
-
Middle Initial
-
Contact section
-
Phone
-
Phone Type
-
Extension
-
Email
-
Email Type
-
-
Address section
Create Reservations for Groups
The following fields are greyed out and displayed in the Guest Information section of the Book a Reservation screen when users search for a guest profile to create reservations for groups (Group ➜ Group Booking ➜ More ➜ Make Reservation ➜ Book a Reservation ➜ Guest Information ➜ Search for a guest):
-
First Name
-
Last Name
-
Middle Initial
-
Contact section
-
Phone
-
Phone Type
-
Extension
-
Email
-
Email Type
-
-
Address section
Add Contacts for Link Groups
The following fields are greyed out and displayed in the Add a Contact pop-up screen when users add a contact for a linked group (Group ➜ Linked Groups ➜ Select group ➜ Group Booking ➜ Group Contacts ➜ Add ➜ Search for a guest):
-
First Name
-
Last Name
-
Middle Initial
-
Contact section
-
Phone
-
Phone Type
-
Extension
-
Use This Phone
-
Email
-
Email Type
-
-
Address section
Add Contacts for Travel Agent Profiles
The following fields are greyed out and displayed in the Add pop-up screen that appears when users add a contact for a travel agent profile (Travel agent profile ➜ Contacts ➜ Add ➜ Search for a guest):
-
First Name
-
Last Name
-
Middle Initial
-
Contact section
-
Phone
-
Phone Type
-
Extension
-
Use This Phone
-
Email
-
Email Type
-
-
Address section
Add Contacts for Company Profiles
The following fields are greyed out and displayed in the Add a Contact pop-up screen that appears when users add a contact for a company profile (Company profile ➜ Contacts ➜ Add ➜ Search for a guest):
-
First Name
-
Last Name
-
Middle Initial
-
Contact section
-
Phone
-
Phone Type
-
Extension
-
Use This Phone
-
Email
-
Email Type
-
-
Address section
Creating Waitlist/Inquiry Records
The following fields are greyed out and displayed in the Profile Details section of the Add Waitlist/Inquiry pop-up screen (Reservations ➜ Waitlist and Inquiry ➜ Add):
-
Last Name
-
First Name
-
Email
-
Phone Number
Modify Booker Profile Details for Reservations
The following fields are greyed out and displayed in the Booker tab of the Book a Reservation screen when users select a guest profile and click on the Edit Profile hyperlink:
-
Last Name
-
First Name
-
Email
-
Phone
Users without the Stay_GuestProfileFieldAddEdit permission assigned are restricted from adding additional contact details to guest profiles such as phone numbers, email addresses, and addresses. Users without the Stay_GuestProfileFieldDelete permission assigned are restricted from deleting the contact details of guest profiles.
Users with the Stay_GuestProfileFieldAddEdit permission assigned can modify the restricted fields configured for guest profiles. The message, This profile is associated with an active reservations and/or loyalty program. Modifying the guest name or contact information could affect the reservation & loyalty. Proceed with caution, is displayed when users modify the restricted fields in the mentioned areas.